The hotbar is where the player can place important items they want to easily access. It is primarily used for weapons and consumables, but you can put any kind of item on it.
Changing the Hotbar Slot Count
For the player we change the default number of slots for the hotbars using the hotbarSlots variable on the Hotbar Configuration section of the AC_InventorySystem component you added to your player controller.
Repositioning the Hotbars
To reposition your hotbar open the UI_Hotbars widget found in the UIs/Hotbar/ folder. Then from the designer tab you can now position your hotbars using the anchors, alignment, and positioning options. In previous versions we had to code dive to change the hotbar position. That is no longer the case, and it is a purely visual process now.
Adding additional Hotbars
In this version of the system you are given the ability to provide multiple hotbars to the player. All hotbars share the same storage component, we assign the slots used by a specific hotbar through the configuration in the designer tab of UI_Hotbars. Follow these steps to add additional hotbars:
- First make sure your hotbarSlots count is adjusted to account for the slots on your new additional hot bar. Remember we only use one hotbar storage component, so if you have 3 hotbars, each with 10 slots, you would set your hotbarSlot count to 30.
- Open the UI_Hotbars widget and from the designer tab add a copy of UI_Hotbar as a child of the hotbarCanvas, just like the default Hotbar.
- Also from the designer tab, position your hotbar where you want it to appear on the viewport. I recommend using the Anchors and then using the Position X/Y as your offsets from the anchor.
- Select the new UI_Hotbar then configure the following variables:
-
If this is the first extra hotbar you are adding to the project, you will need to change the original hotbar's Stop At Index from the default -1, which auto sizes based on the Slot Count value.
When you add more hotbars, use Start and Stop At Index to define which slots that hotbar should show. If your original hotbar has 10 slots, leave Start at Index at 0, and set Stop At Index to 9. If your extra hotbar also has 10 slots, set its Start At Index to 10, and set Stop At Index to 19. We start at 0 instead of 1 because arrays start at 0. These hotbar slots reference data stored in an array, so the indexes need to match that same order.
That is it, if you configured everything properly your extra hotbar should be visible on begin play and accessible to the player.
Keybindings for the Hotbar
We configure our keybindings for each hotbar slot using the IMC_InventoryV4_KBM_Hotbar input mapping context found in the Blueprints/Input/KeyboardMouse/ folder. In addition to input action triggers for the default hotbar slots, this input mapping context also offers a NextSlot, LastSlot and UseItemInSlot action.
The events for these input actions can be found in the event graph of the UI_Hotbars widget found in the UIs/Hotbar/ folder.
If you need to add additional input actions for new hotbar slots you would need to:
- Open the IMC_InventoryV4_KBM_Hotbar input mapping context and expand the IA_Hotbar_TriggerSlot input action.
- You should see all the default keybindings for each slot ( 1 through 0 ). Add an additional element to this input array and set your key binding for it.
- Next add a Scalar modifier to the new input you just added. The Scalar X (first input box) is the one you will use to set the hotbar slot. This needs to be the human readable version of the slot, since we can't use a Scalar of 0 for the first slot (input will not trigger if the scalar is 0), we need to use 1 instead.
In the previous version we had a unique input action for each key binding, and we had to define this input action inside the hotbar widget, as well as manually set up the event for it to run our function for the particular slot. This was a lot of code diving for beginners, and to simplify it I changed it to this new direction that keeps the configuration entirely inside of the enhanced input, input mapping context. It is less moving parts then the previous version, but the parts have to be meticulously ordered and configured.
As long as you follow the format of the other inputs you should be fine at adding additional hotbar slot keybindings.
This works great out of the box for most uses cases. It is when you need more advanced control over each individual hotbar slot that you may run into issues with it. In those scenarios it might be best to change the way this code runs to how it was handled previously, where each slot has its own dedicated unique input action. This is something you will need to have a moderate skill level to change. If you need it, you can use the previous version of this documentation as a guide to see what parts where previously modified by hand when adding new inputs, then extrapolate from that information to make your adjustments to the current code.
How and where are the key bindings shown on hotbar slots?
The UI_HotbarKey widget in the UIs/Hotbar/ folder is the widget used to show the text for each hotbar slot key binding.
The keybinding is defined in the IMC's input action, and is generated inside the UI_Hotbar buildKeybindingMap function. This function will iterate through the keys mapped to our Hotbar Trigger Slot input action. The order of this array is how the association to the hotbar slot works (so make sure your input actions are in order based on the absolute slot number).
The UI_Hotbar CreateHotbarKeyButtons function is what actually creates the UI_HotbarKey widgets using the text from the keybindings map variable (generated by the buildKeybindingsMap function). These widgets are layered on top of the item grid used by the hotbar using its own grid (see the designer tab of UI_Hotbar). The sizing of this key binding grid is calculated and set automatically on begin play based on the values used for the hotbar UI_ItemGrid.
Using Modifier Keys (Shift, Ctrl, Alt) with Hotbar Slots
If you want a hotbar slot to only trigger when a modifier key (such as Shift, Ctrl, or Alt) is also held, you'll need to use Enhanced Input's "Chorded Action" trigger, which is configured in the Input Mapping Context.
This behavior is controlled entirely by Unreal's Enhanced Input system and is not handled by this asset itself. Because of that, the exact setup and troubleshooting of chorded actions are outside the scope of this asset's support. You can learn more from the official Unreal Engine documentation, here are some links to help you get started.
Enhanced Input overview: View Documentation
Chorded Action trigger (UInputTriggerChordAction) API: View Documentation
Using Specialty Slots on Hotbars
You can also assign specialty slots to the hotbar if you want to restrict what can go in specific slots on it. We assign our specialty slots to the slot index through the hotbarSpecialSlots array found in the Hotbar Configuration section of our AC_InventorySystem component added to your player controller. Each array element consists of the SlotNumber and the SpecialSlot row name.
View the specialty slots chapter to learn more about using and creating new ones.
Equipment Equipping from the Hotbar
By default we have equipping equipment through the hotbar enabled. When you equip an item through the hotbar it will override whatever is in the slot in the equipment window, if you have a matching slot with something already in it.
If you would like to disable this functionality and prevent equipment from equipping through the hotbar you would set the AllowEquipFromHotbar? boolean to false in the Equipment Configuration section of the AC_InventorySystem component you added to your player controller.
In the same section you can also define the specific equipment slots you want to be equippable through the hotbar. You would define those slots using the allowEquipFromHotbarOnlySlots. By default this array is empty, and when empty all equipment slots can be equipped through the hotbar.
To re-enable this functionality simply turn the option back on.
Using Items from the Hotbar
One of the main use cases for the hotbar is to provide quick access to using our usable items. To use an item from the hotbar the player simply drags the item to a slot, then the player can either press the keybinding associated with the hotbar slot, or use the next/last input actions to cycle the focus to the slot, then simply press the primary action (left mouse button) to use the item.
In this version the keybinding method to use an item is set up to not lose the focus of your currently selected hotbar slot when you press it. For example if you have a gun in Slot 1 and a heal potion in Slot 2 and you have the gun equipped and you hit the keybinding for Slot 2 it will not actually select the slot, it will keep your gun equipped. Your players can still manually select the slot using the next/last input actions.
Get the currently selected Hotbar Slot
You can get the currently selected slot from the selectedSlot integer found in the UI_Hotbars.
For multiplayer games you should keep in mind this variable is a client side only integer. It is not relayed to the server. If you need this value for whatever reason on the server, then you will need to add additional methods to push that value up to the server when it changes. You will also need to store that value in another location that is accessible by the server (UIs are not replicated).
Hide/Show the Hotbars
You can globally call hideInventorySystem and showInventorySystem from anywhere to toggle the entire system and all of its parts, including the player hotbar.
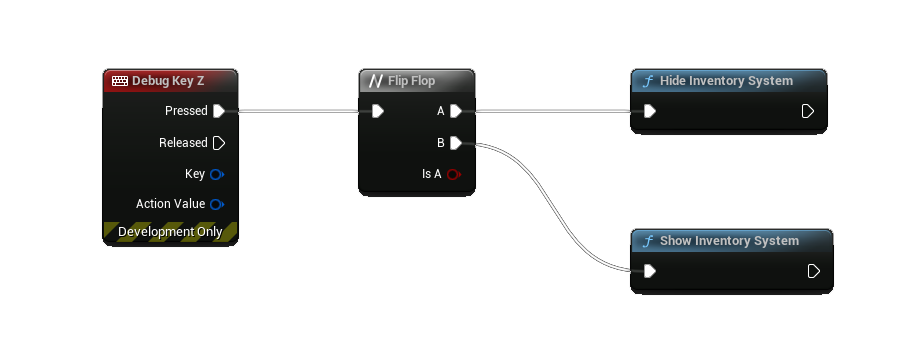
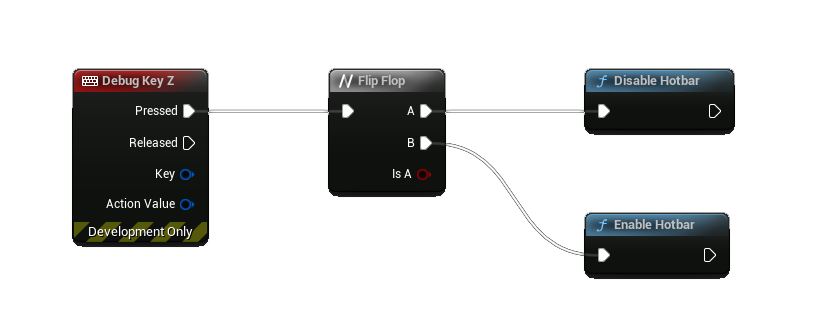
If you would like to just toggle the hotbar you can call the hideHotbar and showHotbar global functions.
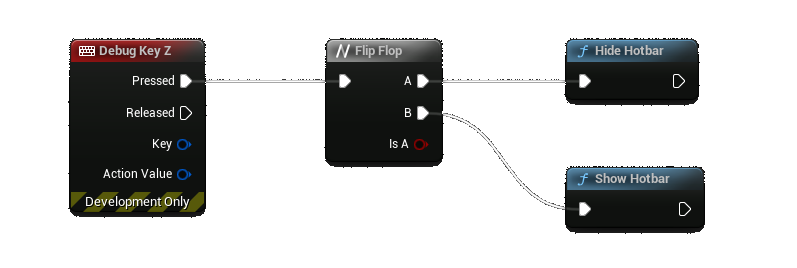
It is worth noting that hiding the Hotbar doesn't disable the functionality and existence of it. It is purely a visual change. To disable and enable you would call the disableHotbar and enableHotbar functions.
Hide/Show the Hotbar Keybindings
You can toggle hiding or showing the keybindings that appear on the hotbar slots through the showKeybindingsOnHotbar? boolean in the Hotbar Configuration section of the AC_InventorySystem component you added to your player controller.
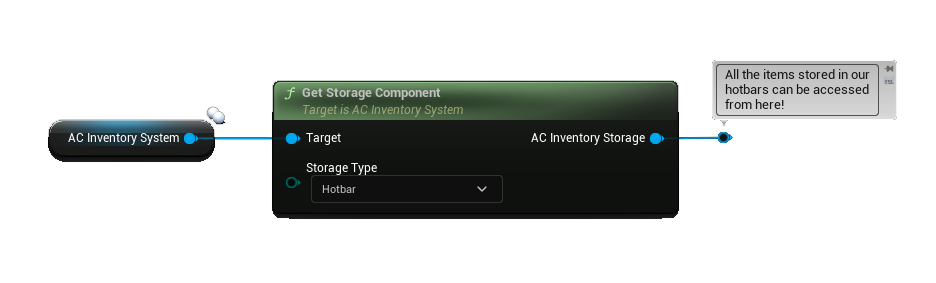
Getting a Reference to the Hotbar Storage Component
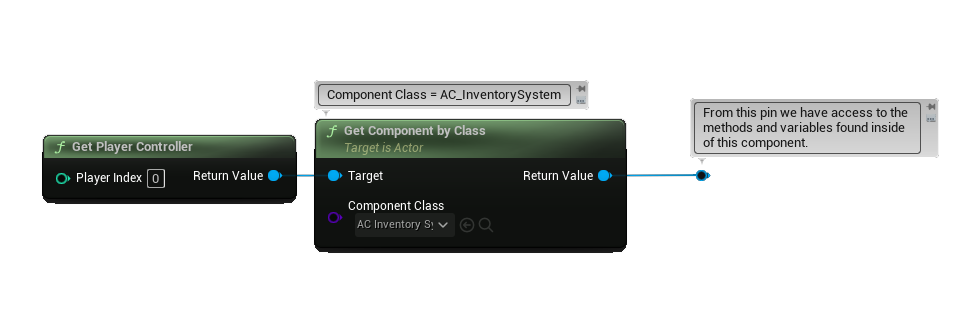
You can get a reference to the storage component for the player hotbar through the AC_InventorySystem component you added to your player controller. From the AC_InventorySystem call the getPlayerStorage function and select Hotbar for the Storage enumeration.
If you don't have a reference to the AC_InventorySystem handy you can use the getComponentByClass on the player controller, then select the AC_InventorySystem component, like this: